TheanoでLSTM②
前回の続き
kento1109.hatenablog.com
今回はLSTM層の構築から見ていく。
lstm_layer
nsteps = state_below.shape[0]
if state_below.ndim == 3:
    n_samples = state_below.shape[1]
else:
    n_samples = 1
state_belowは、emb、
つまり、nstepsは、文書の長さ
※全文書が事前に固定の長さに合わせられている。
次のifは、Trueが想定されるので、
n_samplesは、バッチサイズ(文書サンプル数)となる。
次の関数は一旦、飛ばして
state_below = (tensor.dot(state_below, tparams[_p(prefix, 'W')]) +
               tparams[_p(prefix, 'b')])
これがとてもややこしかった。
でも、ここは入力層→隠れ層の大事な部分。
まぁ、自分なりの解釈で進める。
state_below:3階テンソル(文書の長さ×文書サンプル数×128)
まず、state_belowに渡される embについて整理する。
embは、
emb = tparams['Wemb'][x.flatten()].reshape([n_timesteps,
                                            n_samples,
                                            options['dim_proj']])
で定義されていた。
tparams['Wemb']は、10000×128の行列、
xは、文書の長さ×サンプル数の行列
xをflatten()で一次元するとこんな感じになる。
| doc1,seq1 | doc2,seq1 | ... | docn,seq1 | doc1,seq2 | doc2,seq2 | ... | docn,seqn |
そのベクトルをtparams['Wemb']から抽出する。
イメージはこんな感じ。
import numpy as np

vocab = 10
dims = 5
emd = np.random.rand(vocab, dims)
target = np.array([[1, 3], [2, 6], [0, 5]])

print target.flatten()
[1 3 2 6 0 5]
print emd[target.flatten()]
[[ 0.528  0.989  0.328  0.764  0.772]  # embeddings of word 1
 [ 0.719  0.04   0.249  0.537  0.021]  # embeddings of word 3
 [ 0.919  0.415  0.88   0.175  0.197]  # embeddings of word 2
 [ 0.622  0.713  0.354  0.063  0.126]  # embeddings of word 6
 [ 0.171  0.277  0.301  0.818  0.175]  # embeddings of zero
 [ 0.787  0.355  0.36   0.394  0.236]]  # embeddings of word 5
つまり、この操作でサンプル文書内の単語IDに対応する単語の分散ベクトルを取得している。
そして、reshape()で
seq = 3
samples = 2
print emd[target.flatten()].reshape(seq, samples, dims)
[[[ 0.299  0.013  0.06   0.801  0.756]    # word1 of document1
  [ 0.388  0.573  0.055  0.282  0.281]]   # word1 of document2

 [[ 0.328  0.244  0.967  0.883  0.117]    # word2 of document1
  [ 0.839  0.759  0.661  0.643  0.883]]   # word2 of document2

 [[ 0.371  0.033  0.31   0.141  0.847]    # word3 of document1
  [ 0.895  0.725  0.464  0.907  0.159]]]  # word3 of document2
としている。
これでemdの構造が分かった。
次に、
LSTM_W:行列(128×512)
これはこんなイメージ
dims = 5
rand = np.random.rand(dims, dims)
w = np.concatenate([rand, rand, rand, rand], axis=1)
print w
[[ 0.071  0.342  0.38   0.843  0.672  0.071  0.342  0.38   0.843  0.672
   0.071  0.342  0.38   0.843  0.672  0.071  0.342  0.38   0.843  0.672]
 [ 0.717  0.161  0.686  0.376  0.852  0.717  0.161  0.686  0.376  0.852
   0.717  0.161  0.686  0.376  0.852  0.717  0.161  0.686  0.376  0.852]
 [ 0.514  0.514  0.087  0.115  0.008  0.514  0.514  0.087  0.115  0.008
   0.514  0.514  0.087  0.115  0.008  0.514  0.514  0.087  0.115  0.008]
 [ 0.883  0.164  0.708  0.263  0.032  0.883  0.164  0.708  0.263  0.032
   0.883  0.164  0.708  0.263  0.032  0.883  0.164  0.708  0.263  0.032]
 [ 0.135  0.889  0.705  0.503  0.936  0.135  0.889  0.705  0.503  0.936
   0.135  0.889  0.705  0.503  0.936  0.135  0.889  0.705  0.503  0.936]]
この2つの内積を取るので、
np.dot(emd, w)
[
 [  # seq1
     # sample1
  [ 1.089  1.534  1.24   1.083  1.175  1.089  1.534  1.24   1.083  1.175
    1.089  1.534  1.24   1.083  1.175  1.089  1.534  1.24   1.083  1.175]
     # sample2
  [ 0.726  1.217  1.058  0.99   1.321  0.726  1.217  1.058  0.99   1.321
    0.726  1.217  1.058  0.99   1.321  0.726  1.217  1.058  0.99   1.321]]
 [  # seq2
     # sample1
  [ 1.201  1.092  1.032  1.072  0.789  1.201  1.092  1.032  1.072  0.789
    1.201  1.092  1.032  1.072  0.789  1.201  1.092  1.032  1.072  0.789]
     # sample2
  [ 0.729  0.812  1.113  1.219  1.113  0.729  0.812  1.113  1.219  1.113
    0.729  0.812  1.113  1.219  1.113  0.729  0.812  1.113  1.219  1.113]]
 [  # seq3
     # sample1
   [ 1.779  1.147  1.5    1.032  1.294  1.779  1.147  1.5    1.032  1.294
     1.779  1.147  1.5    1.032  1.294  1.779  1.147  1.5    1.032  1.294]
     # sample2
   [ 0.668  0.836  0.664  0.461  0.682  0.668  0.836  0.664  0.461  0.682
     0.668  0.836  0.664  0.461  0.682  0.668  0.836  0.664  0.461  0.682]]]
となる。
ポイントは、1単語が512次元ベクトル(上の場合、20次元)から成り、128次元毎に同じ値を繰り返していること。
※3階テンソルと行列の計算は下記にまとめた。
kento1109.hatenablog.com
内積は、(文書の長さ×文書サンプル数×128),(128×512)なので、内積を取った後は、
「文書の長さ×文書サンプル数×512」となる。
このテンソルでstate_belowを更新する。
このテンソルを立方体で書くとこんな感じ。

この内積計算(とバイアスの加算)は、下記の計算と同義と考えられる。
これが、LSTMユニットに渡すための入力となる。
そして、LSTMの核となる部分
rval, updates = theano.scan(_step,
                            sequences=[mask, state_below],
                            outputs_info=[tensor.alloc(numpy_floatX(0.),
                                                       n_samples,
                                                       dim_proj),
                                          tensor.alloc(numpy_floatX(0.),
                                                       n_samples,
                                                       dim_proj)],
                            name=_p(prefix, '_layers'),
                            n_steps=nsteps)
このscanとその関数_stepの理解が一番大事なところ。
まず、構成要素をまとめる。
fn(繰り返し呼び出す関数):
直前で定義された_step関数
sequences(fnに連続的に渡されるオブジェクト):
[mask, state_below]
※maskは、文書の長さ×サンプル数の行列
(文字がある箇所は1、paddingした部分は0となっている)
outputs_info:繰り返し処理の初期値となる値
allocは、指定した値で行列を作る関数
なので、ここではサンプル数×128のゼロ行列を作っている
n_steps(繰り返し回数):
文書の長さ
次にの_stepの内容を見ていく。
def _step(m_, x_, h_, c_):
    preact = tensor.dot(h_, tparams[_p(prefix, 'U')])
    preact += x_

    i = tensor.nnet.sigmoid(_slice(preact, 0, options['dim_proj']))
    f = tensor.nnet.sigmoid(_slice(preact, 1, options['dim_proj']))
    o = tensor.nnet.sigmoid(_slice(preact, 2, options['dim_proj']))
    c = tensor.tanh(_slice(preact, 3, options['dim_proj']))

    c = f * c_ + i * c
    c = m_[:, None] * c + (1. - m_)[:, None] * c_

    h = o * tensor.tanh(c)
    h = m_[:, None] * h + (1. - m_)[:, None] * h_

    return h, c
まず、引数の整理
m_:maskx_:state_belowh_:サンプル数×128の零行列c_:サンプル数×128の零行列
次に、
preact = tensor.dot(h_, tparams[_p(prefix, 'U')])
preact += x_
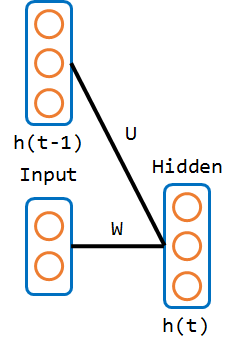
LSTMのパラメータにおいて、Uは前の隠れ層の状態からのパラメータを指すのが一般的。
絵にするとこんな感じ。

preactは、パラメータUとh_tとの内積
h_tは、「サンプル数×128の行列」、パラメータUは、「128×512の行列」なので、内積を取ると、preactは、「サンプル数×512の行列」となることが分かる。
※初期値は、h_tはゼロ行列なので、preactもゼロ行列となる。
その値にx_tを加算している。
preactは下記の各値を保持していることになる。
※preactは、「pre activation」(活性化前の値」の変数の集まり
LSTMの場合、これがユニットへの入力となる。
絵で示すと赤丸の部分である。

この絵は
Understanding LSTM Networks -- colah's blog
で使用されているもの
パラメータを一つずつ見ていく
まずは、入力ゲート
i = tensor.nnet.sigmoid(_slice(preact, 0, options['dim_proj']))
第二引数に0を指定して_slice関数を呼んでいるので、
def _slice(_x, n, dim):
    if _x.ndim == 3:  # default x.ndim == 2
        return _x[:, :, n * dim:(n + 1) * dim]
    return _x[:, n * dim:(n + 1) * dim] # _x[:,0:128]
のようになる。
これを非線形関数のシグモイド関数で写像する。
つまり、
絵にすると、赤丸の部分。

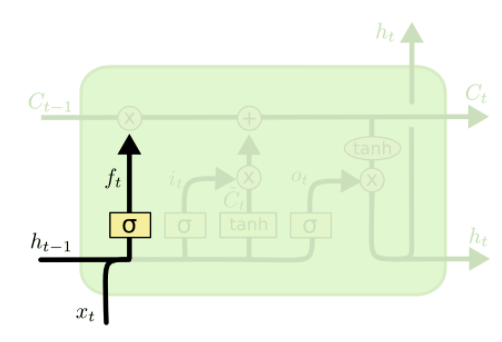
次に、忘却ゲート(x_tの列が異なるだけ)
f = tensor.nnet.sigmoid(_slice(preact, 1, options['dim_proj']))
つまり、
絵にすると、この部分。

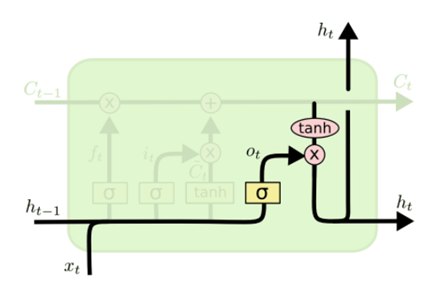
出力ゲートもほとんど同じ。(x_tの列が異なるだけ)
o = tensor.nnet.sigmoid(_slice(preact, 2, options['dim_proj']))
絵にすると、赤丸の部分。

最後に、メモリセル
c = tensor.tanh(_slice(preact, 3, options['dim_proj']))
活性化関数が、tanhだが後はほとんど同じ。
絵にすると、赤丸の部分。

このように、入力に対して、各重みとの線形和をとって非線形関数で写像する。
次に、メモリセルの更新
c = f * c_ + i * c
c = m_[:, None] * c + (1. - m_)[:, None] * c_
数式で書くと下記の通り。
絵で表すとこれ。

下の行でmaskとの積で更新している。
maskは、seqのうち、paddingされた箇所に対応する箇所が0となっている。
つまり、単語IDではない部分のcはゼロ更新している。
右側のmaskを反転させたものとc_は、何をしているか分からない・・
とりあえず、先に進める。
最後はLSTMユニットの出力値
h = o * tensor.tanh(c)
h = m_[:, None] * h + (1. - m_)[:, None] * h_
数式で書くと下記の通り。
ここでも同様にseqに単語IDがない場合はゼロ更新している。
絵で表すとこれ。

_step関数は、更新したc(メモリセル)とh隠れ層の出力を次のseqの更新で繰り返し利用している。
lstm_layer関数は、最後にreturn rval[0]している。
これで、_step関数の一つ目の戻り値(h)を呼び出し元に返す。
※hは、文字の長さ×サンプル数×隠れ層(128)の3階テンソル。
lstm_layerだけで長くなってしまったので、いったん区切る。